
-
Cardboard Sculptures
Working in Bas ReliefObjective:
To create space in your art using overlapping.
To create a bas - relief sculpture based on an animal or a flower design.
To create emphasis using acrylic paint on the artwork.
Materials:
Sketchbook
Pencil
Scratch paper
Colored Pencils
White Glue
Acrylic Paint
Brushes
Cardboard
Art History Connection: Mark LanganMark is a self-taught artist who has been creating art with different mediums for as long as he can remember. Hailing from a family with many artists, Mark's corrugated cardboard masterpieces are his passion and he's devoted to being the best he can be with such an unexpected material source.

Vocabulary:
Bas Relief – A French term from the Italian Basso-Relievo (“low relief”), Bas Relief is a sculpture technique in which figures and/or other design elements are just barely more prominent than the (overall flat) background.
Bas Relief is created by either carving away material (wood, stone, ivory, jade, etc.) or adding material to the top of an otherwise smooth surface (i.e. strips of clay to stone). This is a technique as old as humankind’s artistic explorations and is closely related to high relief. The Egyptians, Persians, Greeks, and many others have used bas-relief.
Procedure:
1. The students will create a design for their bas-relief cardboard sculptures.2. The students will use scissors, cardboard, and white glue to put their sculptures together
3. Using watered-down glue, students will dip paper towels into a bowl of glue and squeeze any extra glue off.
4. The students will sculpt their animals by draping the dipped paper towels onto the pizza box not forgetting to drape over the sides as well.
5. When the glue has dried, the student will paint their animal creations using acrylic paint.*The procedures will change depending on which project the student chooses. *
Examples of Bas Relief Art Work:


A Beginner's Guide to Acrylic Painting:
-
Project 1: Pop Art
Paper Relief SculpturesWhat is Pop Art?
Pop art is an art form based on modern popular culture and the mass media, especially as a critical or ironic comment on traditional fine art values.Elements of Art & Principles of Design:
Line, Color, Balance, Unity
Objective:
I can create an original onomatopoeia paper relief sculpture inspired by Pop Artists.
Art History Connection:
Richard Hamilton, Andy Warhol, Roy Lichtensten, Jean-Michel BasquiatArt Vocabulary:
Pop Art - Pop art is an art form based on modern popular culture and the mass media, especially as a critical or ironic comment on traditional fine art values.Onomatopoeia - is the creation of words that imitate natural sounds.
Ben Day Dots - a term coined to describe small colored dots, typically in cyan, magenta, yellow, and black, that are variously spaced and combined to create shading and complete images – represent said stylistic duality.
Balance - visual weights that offset one another.
Primary Colors - Red, Yellow, and Blue
Warm Colors - is used to describe any color that is vivid or bold in nature. Examples include red, yellow, and orange. (Think volcano)
Cool Colors - is used to describe any color that is calm or soothing in nature. Cool colors are not overpowering and tend to recede (fade) in space. Examples include green, blue, and violet. (Think calming blue waters)
Emphasis - an area or object within the artwork that draws attention and becomes a focal point.
Bas-Relief - A kind of carving or sculpture in which the figures are raised a few inches from a flat background to give a three-dimensional effect.Examples of Student Work:


-
Mini-Project: Expressive Line
Skills Needed:
Creative thinking & Problem solving
Imagination with something personal
Individual thinking
Simple drawing skills
Time needed: No more than 3 class periods!
Vocabulary:
Zentangle - an American method for drawing, which not only promotes concentration and creativity but at the same time increases personal well-being. Zentangle was invented by a monk named Rick Roberts and an artist named Maria Thomas. With Zentangle they created a combination of meditation and art.
Procedure:- Try to make as many types of lines as you can
- Repeat each type of line several times
- Try all types of lines: wavy, curly, jagged, dashes, thick, thin, etc. *Fill your page with as many lines as you can*
Example:

Filling Gap Examples:

-
Project 3: Mixed Media Painting
Working in Bas ReliefObjective:
To study what a variety of animals look like.
To draw studies of animals.
To create space in your art using overlapping.
To create a bas - relief sculpture based on an animal design.
To create emphasis using acrylic paint on the artwork.
Materials:
Sketchbook
Pencil
Newsprint
Colored Pencils
White Glue
Acrylic Paint
Brushes
Cardboard Pizza Box
Water
Vocabulary:
Bas Relief – A French term from the Italian Basso-Relievo (“low relief”), Bas Relief is a sculpture technique in which figures and/or other design elements are just barely more prominent than the (overall flat) background.
Bas Relief is created by either carving away material (wood, stone, ivory, jade, etc.) or adding material to the top of an otherwise smooth surface (i.e. strips of clay to stone). This is a technique as old as humankind’s artistic explorations, and is closely related to high relief. The Egyptians, Persians, Greeks, and many others have used bas-relief.
Color Wheel – The color wheel is the basic tool for combining colors. The first circular color diagram was designed by Sir Isaac Newton in 1666.
Warm Colors – Warm colors are used to describe any color that is vivid or bold in nature. Examples include red, yellow, and orange. (Think volcano)
Cool Colors – Cool colors are used to describe any color that is calm or soothing in nature. Cool colors are not overpowering and tend to recede (fade) in space. Examples include green, blue, and violet. (Think calming blue waters)
Color Scheme – A color scheme is the choice of colors used in design for a range of media.
Analogous color schemes - any three colors that are next to each other on the 12 part color wheel. Usually one is primary or secondary and two on either side are intermediate.
Contrast- difference between two things. When focusing on color, it is the difference of light and dark.
Complementary Colors – colors directly opposite each other in the color spectrum, such as red and green or blue and orange, that when combined in the right proportions, produce white light.
Procedure:
1. The students will design an animal and then draw it onto a pizza box.2. The students will use cardboard and masking tape to build their animal onto a cardboard box.
2. Using watered down glue, students will dip paper towels into a bowl of glue and squeeze any extra glue off.
3. The students will sculpt their animals by draping the dipped paper towels onto the pizza box not forgetting to drape over the sides as well.
4. When the glue has dried, the student will paint their animal creations using acrylic paint.Examples of Bas Relief Art Work:

© Claudia Pena-Martinez

see original: https://i.pinimg.com/originals/73/d3/0a/73d30a775283d09b98e56eceb8461817.jpg
painting by: melaniedavidart.com
A Beginner's Guide to Acrylic Painting:

-
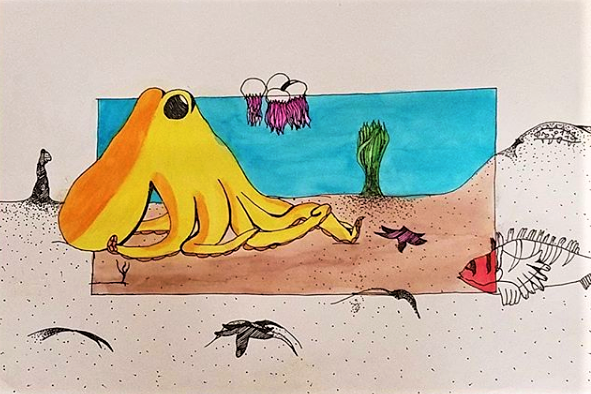
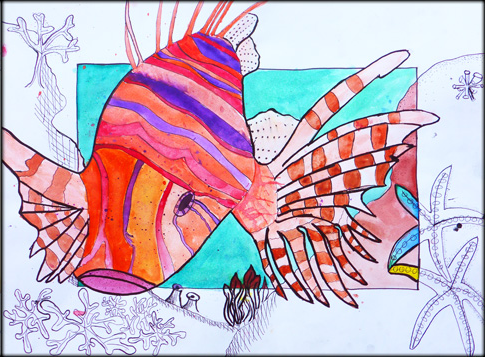
Project 2:
Beyond Borders
Water LifeObjective:
I can draw a detailed animal from observation.
I can use the "Rule of Thirds" to place the focal point of my animal drawing off-center in an original artwork.
I can use different types of value to create texture.
I can use watercolor and permanent marker to create emphasis in my artwork.
Materials:
Pencil
Eraser
Sketchbook
Plastic sea creatures to draw from observation
Permanent markers (black)
Watercolor paint
11x14 Watercolor Paper
Art Vocabulary:
Center of Interest - the part of the picture that attracts the mind.
Focal Point - the area of the picture that attracts the eye.
Scale - the size of an object.
Foreground - the position of the scene nearest the viewer.
Rule of Thirds - Applied by aligning a subject with the guide lines and their intersection point, placing the horizon on the top or bottom line, or allowing linear features in the image to flow from section to section.
Hatching - An artistic techinque used to create tonal or shading effects by drawing closely spaced parallel lines.
Crosshatching- is the drawing of two layers of hatching at right-angles to create a mesh-like pattern.
Stippling - to mark a surface with numerous small dots or specks.
Procedure:
1. Choose from a variety of sea animal toys to create studies (drawings) of. Spend the first part of the class looking closely at as many different sea animals as you can. Pay close attention to the body shapes and lines that distinguish the different part of the animal.
2. Create several drawings of the sea creature of your choosing. Carefully follow along the designs and show every detail of your animal. Remember to draw different views (front, back, aerial, profile).
3. Draw a rectangle border around your scratch paper.
4. Once the border is drawn off, draw the sea creatures using the "rule of thirds."
5. Now that you have a design, you must scale it up to an 11x14 sheet of watercolor paper. Remember to start by drawing a border around your paper.
6. Next, add texture and value to your drawing by using stippling, hatching and cross-hatching drawing techniques.
7. Finally, use watercolors to create emphasis on your project by only adding color to the part of the drawing inside the border.
Adding Value to Create Forms:

How to use rule of thirds to create an interesting composition:


-
Mini-Project: My Hand of Imagination
5 things my fingers could become whenever I wanted them to.
Skills Needed:
Creative thinking & Problem solving
Imagination with something personal
Individual thinking
Simple drawing skills
Descriptive writing
Time needed: No more than 3 class periods!
Procedure:
***You will use your imagination! Using the computer to find images will not be allowed! ***
1. Use a pencil to trace around your hand on a light colored 6 x 9 inch sheet of construction paper.
(The teacher will cut these down to size for you.)
2. Make a list of 5 or more things your fingers could become on the back of the paper. Leave enough room to write about why you chose each object.
3. What will your fingers become?
4. Practice drawing the objects you chose in detail on a scratch sheet of paper. ( 1 class period)
5. When you are ready, erase one finger at a time on your colored construction paper and draw your choice in it's place. **Remember: In order to avoid "ghost lines", you must "draw light until it is right." **
6. Color your drawing neatly.
7. Write about it! You must write why you chose each object for your finger in complete sentences on the back of your paper.
8. You may not copy my examples! You must use your imagination and create your own drawing!!!!!!
9. Make sure your First Name, Last Name, Date, and Period are on the back.Student Work Examples:

-
Mini-Project 2: Think Aliens!
Repurposing magazines to create a work of artObjective: I will find an image of a person, and then turn them into an alien using the amazing drawing skills I have learned this semester.
Skills Needed:
Creative Thinking & Problem Solving
Imagination with something personal
Individual Thinking
Time Needed:
2-3 Class Periods!
Materials:
Paper
Pencil
Permanent Marker
Magazines or Newspapers
Crayons
Colored Pencils
Paper
Procedure:
1. Find a photograph of a face in a newspaper or magazine and cut it out.
2. Choose to use either the top half of the face or the bottom half and glue it to a sheet of paper.
3. Turn the image into an alien using ONLY a permanent marker. That means no pencils are allowed for this assignment.
4. Create a background for your drawing.
5. Color your drawing using crayons and/or colored pencils.
6. Make sure your First Name, Last Name, Date and Period are on the back.
7. Turn in your mini-project for a grade.Examples of Student Work:

-
Project 1: Torn Paper AnimalsObjective:
I can draw a detailed animal from observation.
I can use torn paper/magazines to create an animal collage on a cardboard panel.
I can use torn pieces of paper/magazines to create emphasis on my project.Materials:
Pencil
Scratch Paper
Plastic animals to draw from observation
11x14 inch cardboard panel
Glue
Art History Connection: Deborah Shapiro
Deborah Shapiro is a contemporary artist living in Bath Township, Ohio. She is famous for her collage art that are created with ripped and cut bits of paper from magazines. (Watch both videos about Deborah Shapiro. Remember to click cc to add captions)Art Vocabulary:
Please write these in your sketchbook for a grade!
Scale: The size of an object in relationship to another object.
Proportion: The relative size of parts of a whole.
Collage: A technique of composing a work of art by pasting (gluing) various materials on a single surface normally not associated with one another, such as newspaper clippings, part of photographs, theater tickets, etc.
Positive space: The main focus of a picture or artwork.
Negative space: The background of a picture or artwork.
Unity: Creates a sense of harmony or wholeness, by using similar elements within the composition and placing them in a way that brings them all together.
Composition: The placement or arrangement of visual elements in a work of art. (How objects are arranged in a work of art)
Procedure:
1. Choose from various plastic animals or insects to create studies (observational drawings) of. Spend the first part of the class looking closely at the animal you chose. **Remember to look closely at the body shapes, and pay close attention to the lines that distinguish the different parts of the animal.
2. Fold a scratch sheet of paper twice leaving so that the sheet of paper is divided in quarters. Then draw your animal from four different angles on each quarter of the page filling the entire rectangle. (Front, Back, Side [profie view], Top [bird's eye view])
3. Fold a second sheet of scratch paper in half. Look at the 4 different drawings you created. Choose which two are the best drawings. Now draw each angle on a half sheet of paper filling the entire rectangle.
4. Get a full sheet of scratch paper. Look at the two angles you drew of your animal. Choose the best of the two angles and draw it on a full sheet of scratch paper. Next, label each body part of your animal or insect.
5. Now that you have completed all 7 drawings of your animal/insect, sketch your animal onto an 11x14 inch cardboard panel. Make sure to enlarge (scale up) the animal to fill the entire space of the cardboard panel.
6. Go to the magazine bins that have been separated by colors and choose the colors you need to complete your assignemnt. Place the magazine pages inside of a gallon sized plastic bag. Make sure your name, date and period are written on this bag. This is where you will save all the pieces of torn paper you will be using.
7. **Remember a dot does a lot when it comes to glue** Put a dot of glue on your cardboard then place the piece of torn paper onto the glue dot. Then put a glue dot ontop of the piece of torn paper and spread the glue. (So you should have glue under and over the torn paper. )
Examples of Student Work:

Value:


-
Mini- Project 1
Objective: I can create a sketchbook cover design using the art element of line.
- You must include your first name or last name or both.
- You must create a design using the art element of line.
- Use watercolor paint to cover the entire background

-
2018-2019 School Year
Project 2: Mixed Media Painting
Working in Bas ReliefObjective:
To study what a variety of flowers look like.
To draw studies of flowers.
To create space in your art using overlap.
To create a bas - relief sculpture based on a flower design.
To create emphasis using acrylic paint on the artwork.
Materials:
Sketchbook
Pencil
Newsprint
Colored Pencils
White Glue
Acrylic Paint
Brushes
Cardboard Pizza Box
Water
Vocabulary:
Bas Relief – A French term from the Italian Basso-Relievo (“low relief”), Bas Relief is a sculpture technique in which figures and/or other design elements are just barely more prominent than the (overall flat) background.
Bas Relief is created by either carving away material (wood, stone, ivory, jade, etc.) or adding material to the top of an otherwise smooth surface (i.e. strips of clay to stone). This is a technique as old as humankind’s artistic explorations, and is closely related to high relief. The Egyptians, Persians, Greeks, and many others have used bas-relief.
Color Wheel – The color wheel is the basic tool for combining colors. The first circular color diagram was designed by Sir Isaac Newton in 1666.
Warm Colors – Warm colors are used to describe any color that is vivid or bold in nature. Examples include red, yellow, and orange. (Think volcano)
Cool Colors – Cool colors are used to describe any color that is calm or soothing in nature. Cool colors are not overpowering and tend to recede (fade) in space. Examples include green, blue, and violet. (Think calming blue waters)
Color Scheme – A color scheme is the choice of colors used in design for a range of media.
Analogous color schemes - the use of colors that are next to each other on the color wheel. They usually match well and create serene and comfortable designs. Analogous color schemes are often found in nature and are harmonious and pleasing to the eye. Make sure you have enough contrast when choosing an analogous color scheme.
Contrast- When defining it, art experts refer to the arrangement of opposite elements (light vs. dark colors, rough vs. smooth textures, large vs. small shapes, etc.) in a piece so as to create visual interest, excitement, and drama.
Complementary Colors – colors directly opposite each other in the color spectrum, such as red and green or blue and orange, that when combined in the right proportions, produce white light.
Procedure:
1. Students will design a flower and draw it onto a pizza box.
2. Using watered down glue, students will dip paper towels into a bowl of glue and squeeze any extra glue off.
3. The stud watercolor paper. To help get the critters larger than life, the students will sculpt their flowers by draping the dipped paper towels onto the pizza box not forgetting to drape over the sides as well.
4. When the glue has dried, the student will paint their flower creations using acrylic paint.Examples of Student Work:


Georgia O'Keefe Flower Paintings:
A Beginner's Guide to Acrylic Painting:
-
Mini-Project 2: Think Aliens!
Repurposing magazines to create a work of artObjective: I will find an image of a person, and then turn them into an alien using the amazing drawing skills I have learned this semester.
Skills Needed:
Creative Thinking & Problem Solving
Imagination with something personal
Individual Thinking
Time Needed:
2-3 Class Periods!
Materials:
Paper
Pencil
Permanent Marker
Magazines or Newspapers
Crayons
Colored Pencils
Paper
Procedure:
1. Find a photograph of a face in a newspaper or magazine and cut it out.
2. Choose to use either the top half of the face or the bottom half and glue it to a sheet of paper.
3. Turn the image into an alien using ONLY a permanent marker. That means no pencils are allowed for this assignment.
4. Create a background for your drawing.
5. Color your drawing using crayons and/or colored pencils.
6. Make sure your First Name, Last Name, Date and Period are on the back.
7. Turn in your mini-project for a grade.Examples of Student Work:
-
Mini-Project: My Hand of Imagination
5 things my fingers could become whenever I wanted them to.
Skills Needed:
Creative thinking & Problem solving
Imagination with something personal
Individual thinking
Simple drawing skills
Descriptive writing
Time needed: No more than 3 class periods!
Procedure:
***You will use your imagination! Using the computer to find images will not be allowed! ***
1. Use a pencil to trace around your hand on a light colored 6 x 9 inch sheet of construction paper.
(The teacher will cut these down to size for you.)
2. Make a list of 5 or more things your fingers could become on the back of the paper. Leave enough room to write about why you chose each object.
3. What will your fingers become?
4. Practice drawing the objects you chose in detail on a scratch sheet of paper. ( 1 class period)
5. When you are ready, erase one finger at a time on your colored construction paper and draw your choice in it's place. **Remember: In order to avoid "ghost lines", you must "draw light until it is right." **
6. Color your drawing neatly.
7. Write about it! You must write why you chose each object for your finger in complete sentences on the back of your paper.
8. You may not copy my examples! You must use your imagination and create your own drawing!!!!!!
9. Make sure your First Name, Last Name, Date, and Period are on the back.Student Work Examples:
-
Project 1: Looking at Insects (part 2)
Adding Watercolor to an Ink DrawingObjective:
To explore various watercolor techniques.
The students will complete the background of their insect drawing by filling it with watercolor.Getting Started in watercolor tutorial:
Examples of different watercolor techniques:

-
Project 1: Looking at Insects (part 1)
Drawing for StudyElements of Art and Principles of Design:
Value, Emphasis, Balance
Objective:
To study what a variety of insects look like by doing studies (drawings) of them. The students will choose one insect to draw and use stippling to create value.
Materials:
sketchbook
pencil
various toy insects
permanent marker
watercolor paper
watercolor paint
Vobabulary
Center of Interest (focal point) - the part of the picture that attracts the eye.
Scale - the size of an object in relation to another object.
Foreground - the part of a scene nearest the viewer.
Background - the part of the scene farthest from the viewer.Rule of Thirds - is a technique designed to help artists and photographers build drama and interest in an artwork. The rule states that an artwork should be divided into nine squares of equal size, with two horizontal lines intersecting two vertical lines.
Monumental - Larger than life size.
Composition - how objects are placed or arranged within an artwork.
Stippling - A painting or drawing created by using dots or small spots.
Art History Connection: Georgia O'KeeffeArtists such as Georgia O'Keeffe understood how to make a small object dominate a landscape and appear larger than life. She placed natural objects such as shells, a flower or bones in the foreground and made them monumental, dominating the composition.
Group Share:
In your table groups come up with two things you learned from watching this video. Share your findings with the class.Procedure:
1. The students will choose various insects to create studies (drawings) of. They will spend the first part of the class looking closely at as many different types of insects. The students will look closely to see antennae, legs, feelers, body shapes, and pay close attention to lines that distinguish the different part of the insects.
2. The students will create scientific drawings of the two insects they choose labeling all the parts of the insect. They will carefully follow along the designs showing every detail.
3. The students sill choose one insect the find most interesting. They will draw the insect they chose large enough to fit on an 11x14 inch sheet of watercolor paper. To help get the critters larger than life, the students will put a mark at the top of the paper indicating where the head is, leaving room for the antennae or the feelers. Then they will place a mark where the bottom of the bug would be. The students will also fill in between the marks with detials of the bug.
4. Once the insect is drawn, the student will add texture and value to their drawing by using stippling to create value.Stippling (Pointillism) Value Scale Example:


Value and Form Examples:
Begins, Kim. "Value and Form. "Web log post. Mrs. Begins' Art Room. N.p.,n.d.Web.
Student Work Photo Gallery:


-
Mini- Project 1
Objective: I will create a sketchbook cover design using the art element of line.
- You must include your first name or last name or both.
- You must create a design using the art element of line.
- Use watercolor paint to cover the entire background
Examples of Student work:
-

Example of Student Work:

-
Project 5:
Making Abstract Ceramic MasksObjective:
I will re-visit the amazing creations of sculptor, Kimmy Cantrell.
I will brainstorm at what features make Cantrell's artwork unique.
I will create an abstract clay mask based on a sketch that I designed.
I will finish my design by using bright colored acrylic paint.Elements of Art & Princples of Design:
Form, Color, Shape, Texture - Balance, Unity/Variety, Emphasis
Vocabulary:
Abstract Art - Art that does not attempt to represent external reality, but seeks to achieve its effect using shapes, forms, colors, and textures.
Asymmetry - The lack of equality between parts of something. Not the same on both sides.
Symmetry - A kind of balance. Parts are not necessarily alike but only similar.
Materials:
Mask design
Scratch Paper
Pencil
Eraser
Clay
Tools for working with clay
Acrylic paint
Paint brushes
Art History Connection: Kimmy Cantrell
* Re-visit Powerpoint presentation on Kimmy Cantrell from previous lesson*
Examples of Student Work:
-
Project 4: Pinch Pot Animals
Objective:
- I will model clay with control
- I will build upon past knowledge in order to craft an original three-dimensional artwork.
- I will create an art object demonstrating the use of the elements of art and principles of design through observation, investigation, and discipline.
- I will use ceramic vocabulary when referring to the processes of shaping clay.
Materials:
Sketchbook
Pencil
Animals to draw from observation
Low Fire Clay
Clay working tools
Kiln
Glaze
How to make a pinch pot (Click Here)Examples of Simple Pinch Pot Sketches:

Examples of Student Work:


-
Project 3: Making Abstract Masks
Elements of Art and Principles of Design:
Emphasis - Emphasis is defined as an area or object within the artwork that draw attention and becomes a focal point.
Texture - Texture is the visual surface quality of an artwork. For example, It may look rough but feels smooth when touched.
Pattern - Pattern can be described a s a repeating shape.
Art Vocabulary:Abstract art - Abstract art does not represent reality, it acheives its effect using shapes, forms, colors, and textures.
Asymmetry - Asymmetry is the lack of equality between parts of something. (Not the same on both sides.)
Symmetry - Symmetry is often used to mean a kind of balance. Parts are not necessarily alike but only similar.
Art History Connection: Kimmy Cantrell* Please see powerpoint presentation about Kimmy Cantrell
Objective:
I will explore the amazing creations of sculptor, Kimmy Cantrell.
I will look and brainstorm at what features make Cantrell's artwork unique.
I will create a colorful mask using oil pastels and cardboard based on a stetch that I designed.
Materials:
Your imagination
Pencil
Erasers
Sketchbook
Markers + Colored Pencils
Reclaimed cardboard - thick+thin+corrugated varieties
Scissors
Permanent markers
Elmer's glue
Oil PastelsExamples of student work:


-
Mini Project 4: Designing a Sketchbook Cover
Objective: I will create a sketchbook cover design using a creative lettering style for my name along with 2-3 elements or principles of design.
- You must draw your first name or last name or both using a creative lettering style.
- You must create a design using the 2-3 elements & principles of design.
- Use watercolor paint to cover the entire background of the design you created.
- While the watercolor paint is still wet, sprinkle some salt on the cover.
- Carefully take your sketchbook cover to the drying rack.
Examples of Student Work:
-
Mini-Project 3: Think Aliens!
Repurposing magazines to create a work of artObjective: I will find an image of a person, and then turn them into an alien using the amazing drawing skills I have learned this semester.
Skills Needed:
Creative Thinking & Problem Solving
Imagination with something personal
Individual Thinking
Time Needed:
2-3 Class Periods!
Materials:
Paper
Pencil
Permanent Marker
Magazines or Newspapers
Crayons
Colored Pencils
Paper
Procedure:
1. Find a photograph of a face in a newspaper or magazine and cut it out.
2. Choose to use either the top half of the face or the bottom half and glue it to a sheet of paper.
3. Turn the image into an alien using ONLY a permanent marker. That means no pencils are allowed for this assignment.
4. Create a background for your drawing.
5. Color your drawing using crayons and/or colored pencils.
6. Make sure your First Name, Last Name, Date and Period are on the back.
7. Turn in your mini-project for a grade.Examples of Student Work:

-
Mini-Project 2: My Hand of Imagination
5 things my fingers could become whenever I wanted them to.Skills Needed:
Creative thinking & Problem solving
Imagination with something personal
Individual thinking
Simple drawing skills
Descriptive writing
Time needed: No more than 3 class periods!
Procedure:
***You will use your imagination! Using the computer to find images will not be allowed! ***
1. Use a pencil to trace around your hand on a light colored 6 x 9 inch sheet of construction paper.
(The teacher will cut these down to size for you.)
2. Make a list of 5 or more things your fingers could become on the back of the paper. Leave enough room to write about why you chose each object.
3. What will your fingers become?
4. Practice drawing the objects you chose in detail on a scratch sheet of paper. ( 1 class period)
5. When you are ready, erase one finger at a time on your colored construction paper and draw your choice in it's place. **Remember: In order to avoid "ghost lines", you must "draw light until it is right." **
6. Color your drawing neatly.
7. Write about it! You must write why you chose each object for your finger in complete sentences on the back of your paper.
8. You may not copy my examples! You must use your imagination and create your own drawing!!!!!!
9. Make sure your First Name, Last Name, Date, and Period are on the back.Worksheet for Project:
Student Work Example:
-
Project 2: Torn Paper Animals
Objective:
I can draw a detailed animal from observation.
I can use torn paper/magazines to create an animal collage on a cardboard panel.
I can use torn pieces of paper/magazines to create emphasis on my project.Materials:
Pencil
Scratch Paper
Plastic animals to draw from observation
11x14 inch cardboard panel
Glue
Art History Connection: Deborah Shapiro
Deborah Shapiro is a contemporary artist living in Bath Township, Ohio. She is famous for her collage art that are created with ripped and cut bits of paper from magazines. (Watch both videos about Deborah Shapiro. Remember to click cc to add captions)Art Vocabulary:
Please write these in your sketchbook for a grade!
Scale: The size of an object in relationship to another object.
Proportion: The relative size of parts of a whole.
Collage: A technique of composing a work of art by pasting (gluing) various materials on a single surface normally not associated with one another, as newspaper clippings, part of photographs, theater tickets, etc.
Positive space: The main focus of a picture or artwork.
Negative space: The background of a picture or artwork.
Unity: Creates a sense of harmony or wholeness, by using similar elements withing the composition and placin them in a way that brings them all together.
Composition: The placement or arrangement of visual elements in a work of art. (How objects are arranged in a work of art)
Procedure:
1. Choose from various plastic animals or insects to create studies (observational drawings) of. Spend the first part of the class looking closely at the animal you chose. **Remember to look closely at the body shapes, and pay close attention to the lines that distinguish the different parts of the animal.
2. Fold a scratch sheet of paper twice leaving so that the sheet of paper is divided in quarters. Then draw your animal from four different angles on each quarter of the page filling the entire rectangle. (Front, Back, Side [profie view], Top [bird's eye view])
3. Fold a second sheet of scratch paper in half. Look at the 4 different drawings you created. Choose which two are the best drawings. Now draw each angle on a half sheet of paper filling the entire rectangle.
4. Get a full sheet of scratch paper. Look at the two angles you drew of your animal. Choose the best of the two angles and draw it on a full sheet of scratch paper. Next, label each body part of your animal or insect.
5. Now that you have completed all 7 drawings of your animal/insect, sketch your animal onto an 11x14 inch cardboard panel. Make sure to enlarge (scale up) the animal to fill the entire space of the cardboard panel.
6. Go to the magazine bins that have been separated by colors and choose the colors you need to complete your assignemnt. Place the magazine pages inside of a gallon sized plastic bag. Make sure your name, date and period are written on this bag. This is where you will save all the pieces of torn paper you will be using.
7. **Remember a dot does a lot when it comes to glue** Put a dot of glue on your cardboard then place the piece of torn paper onto the glue dot. Then put a glue dot ontop of the piece of torn paper and spread the glue. (So you should have glue under and over the torn paper. )
Examples of Student Work:


-
Project 1: Spooky House Silhouette
Wax Resist Watercolor Painting
Objective:
- I can draw a spooky house using the art element of shape such as a square or rectangle.
- I can also add details such as a roof, towers, porch, or banister, etc.
- I can add details to the background such as a moon, tree, or tombstone.
- When my drawing is complete, I can create a watercolor wash in cool colors (blue, purple, green) for the sky.Vocabulary:
Silhouette - A silhouette is an outline of something that is filled in with a solid color. Before photography was invented, it was very popular for people to pay to have their profiles cut into silhouettes by artists.
Watercolor Wash - A watercolor wash is diluted watercolor paint applied to a work of art.
Materials:Pencil
Sketchbook / Scratch Paper
140 lb. Watercolor Paper
Crayons or Oil Pastels
Watercolor Paint (blue, purple, green)
Your Imagination
Art History Connection:Kara Walker is an African American contemporary artist and painter who is best known for her room-sized tableaux of black cut- paper silhouettes. Walker lives in New York and has taught at Columbia University. (Watch Video on Kara Walker under Art History Connections Tab)
Procedure:Step 1: Using scratchpaper, sketch out an original spooky house design using a square or rectangle. Don't forget to add detials such as a roof, porch, or towers.
Step 2: Decide what details to add to the background (moon, tree, or tombstone). Add these detials to your scratchpaper drawing.
Step 3: Test out your color scheme on your practice sheet.
Step 4: Once your design is complete, draw it lightly on your watercolor paper.
Step 5: Starting with light colored oil pastels (yellow) fill in your moon and windows.
Step 6: Using black oil pastels, fill in the spooky house, ground, tombstones and trees.
Step 7: Watch video called, "How to Paint in Watercolor." Pause tutorial as you work along side the video.
Step 8: Watercolor the entire backgroud using cool colors ( blue, purple, green).
Examples of Stuent Work:
